Saturday, July 31, 2010

Mom's Pizza

Another family staple 'round these parts is Mom's pizza. Every vacation from school or time when the family would gather at home we would request Mom's pizza. The crust is different (and way better!) than any delivery pizza. Plus, making pizza at home is fun! There's so much shredded cheese to eat. That's gotta be the best part!
Emily and I had our first attempt at Mom's pizza when she came down for a visit. Overall I would consider it a success. I definitely needed some extra instruction as far as rolling out the dough. But with some help and a little practice, I managed to roll out a lovely circle, all ready for topping!
Mom's Pizza

1 package (1/4 ounce) active dry yeast
1 c. warm water (use very warm tap water)
1 tbsp. sugar
3 c. flour
1/2 tsp. salt

In a large bowl, dissolve the yeast in the warm water, Add the sugar and leave it for 5 to 10 minutes. This will result in a little film or foam, like the picture below:


Add 1 cup of flour and beat well. Sift together the remaining 2 cups of flour and 1/2 tsp. of salt and add it to the bowl. Beat until smooth and if you find your dough too sticky, add some more flour. The dough should be fairly stuff by the time you're done. Turn the dough out onto a lightly floured surface and let it sit for 3 - 5 minutes. Knead the dough for 2 - 5 minutes.

Place the dough in a greased bowl and let it stand in a warm place, free from drafts until slightly risen, about 30 minutes. Divide the dough in half and knead each piece slightly. Wrap each piece loosely in plastic wrap. Be sure to wrap it loosely so the dough can continue to rise. Refrigerate until ready to use, at least 2 hours.

Preheat the oven to 425. Brush two pizza pans with oil. Roll out the dough to fit the pizza pan. Top your pizza with the sauce and toppings of your choice. Bake the pizza for about 15 minutes. It's probably best to bake one pizza at a time, or else the crust may not brown properly. Watch it to make sure it doesn't get overdone, you will be able to tell when it's ready. Let the pizza sit for 2 - 3 minutes before cutting into it.

Not so scary for pizza, huh?! Enjoy!

Wednesday, July 21, 2010

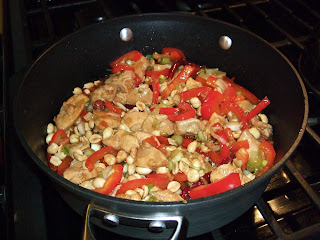
Kung Pao Chicken!

I really do love to cook. Even after a long day at work, coming home and making dinner doesn't seem like a chore. I mean, afterall, that was the whole point of this, right?! I had a lot of fun with this dish. I got really tired of my old go-to stir fry, so I decided I needed another way to cook meat and veggies and serve with rice. I LOVE Kung Pao chicken when I've ordered it in the past. Why not make my own? I had a blast hanging out in the kitchen messing with different ingredients (and enjoying a glass of white wine, I must say!) to get just the taste I was looking for.

I tweaked a couple different recipes and read up on Kung Pao Chicken so that I could really try to get the flavor right. It was definitely not standard stir-fry! I thought the flavor was great and the spice was just right. Definitely a little heat, but nothing bad at all. Don't be concerned at the number of ingredients. Many of them you probably have on hand, and the ones you don't I'm sure are worth the investment! They're not expensive and will likely last a long time.

There weren't many leftovers, but what we had the hubs has already done away with... I think that's the sign of a successful meal!

Kung Pao Chicken
adapted from Cooks Illustrated via The Way the Cookie Crumbles

3 cloves of garlic, finely chopped
1 tbsp. grated or minced ginger
5 - 6 scallions, white parts and light green parts chopped
2 large chicken breasts
1 red bell pepper, chopped
7 whole red chiles
1 tbsp. vegetable oil
1 tsp. sesame oil
1/2 - 1 cup roasted, unsalted peanuts

Marinade:*
1 tbsp. dry sherry
1 tbsp. soy sauce
1 tbsp. chicken broth

Sauce:**
1/2 cup chicken broth
3 tbsp. apple cider vinegar
2 tsp. sesame oil
1 tbsp. soy sauce
1 tbsp. + 1 tsp. hoisin sauce
1 1/2 tsp. cornstarch

Cut the chicken into bite size pieces. Mix the marinade ingredients in a small bowl. Toss in the chicken and marinade at least 10 minutes. While this is marinating is a good time to prepare the ginger, garlic, red pepper, and scallions.
Meanwhile, mix the sauce ingredients in a small bowl with a whisk and set aside.

Heat the vegetable oil and sesame oil in a wok or large frying pan. Add the chicken. Once the chicken is browned, add the chiles whole. I was somewhat careful not to break them apart once I added them to the pan so that the seeds wouldn't be released and make the dish super spicy. Not sure if this is legitimate, but it seemed to work. Add the garlic and ginger and cook for about 3 minutes. Add the red pepper and cook until slightly softened, about 5 minutes. Whisk the sauce again to recombine and add it to the pan; cook until slightly thickened. Last, add the green onions and peanuts and mix everything thoroughly.

Serve over rice. Trust me, it won't last long!

*This dish would be pretty easy to turn vegetarian. If I was going to do that I would use tofu because I think it would hold the marinade better than some other substitutes. Feel free to keep us posted if you try it one way or the other!

**The only thing I would change is to make more sauce next time. The dish was still tasty, but I tend to like things extra saucy. So I would up the broth to 3/4 cup and adjust other flavors accordingly.

Monday, July 19, 2010

Dad's 2nd Annual Crab Feast

We got word about ten days beforehand that my dad was going to be hosting a crab feast at his house in Washington, DC. At first, we didn't think there was any way we could go on such short notice. But the more we thought about it, and the more we thought about the crabs, it seemed like the perfect excuse to get away for a weekend. The idea of sitting out on the deck with a cold beer and a fresh, Maryland steamed crab was more than we could handle!

This is Dad's 2nd Annual Crab Feast. Last year he purchased the crabs already steamed. This year he decided to steam them himself. Granted, I didn't have to do any of the hard work, but I would say steaming them at home is definitely the way to go. We bought a bushel of crabs and went through them so quickly. It was definitely a success. The weather was gorgeous and the crabs were perfect.

I was hoping to get a serious tutorial on how to steam the crabs, but I got trumped by a four year-old who wanted to help! So I watched from afar. I honestly have no idea what the amount of each of the spices was. I will just list the spices, and if anyone really wants proportions I can find out. One helpful hint is to refrigerate the crabs prior to cooking so that they don't move around as much. This makes them easy to work with and makes going from live crabs to perfectly steamed crabs even easier.

We had a blast and seriously enjoyed some major crabbing! Thanks, Dad!
Dad's Maryland Steamed Crabs

vinegar
beer
Old Bay
dry mustard
celery seed
sea salt
cayenne pepper
cracked black pepper

In a large pot (at least five gallons), place a rack or some form of steamer about an inch off the bottom of the pot. Heat equal parts beer (one beer) and vinegar until steaming. Layer the crabs and spices to taste (cover one layer of crabs with spices before layering the next) on the rack. Steam until the crabs turn a nice orange color (about 25 to minutes).

Be prepared to make a mess of yourself while eating! But don't worry, they're so good you won't even care!

Tuesday, July 13, 2010

Another Deee-licious Pasta

This recipe was exciting for me. Most of what I cook comes from something tried and true. Something I can read and then use to carefully measure everything that goes into the dish. For this one, it was a mere concept in my head. I knew I wanted mushrooms. I figured I'd better add some meat for the hubby. And I knew I didn't want "plain" tomato sauce.

I threw things together, actually remembering to write things down and measure for once! You know what? It came out perfect! I was sooo psyched that this pasta dish was so delicious. I have honestly been craving this ever since. The sauce was flavorful and the mushrooms and sausage were a fabulous combination. Overall, this was a huge success, and I can't wait to make it again!

Pasta with Sausage & Mushrooms in Tomato Cream Sauce

1 package mild Italian sausage
10 ounces mushrooms*
1-15 ounce can of tomato sauce/crushed tomatoes
2 cloves garlic, chopped
1 tbsp. fresh basil, chopped
1 tbsp. fresh oregano, chopped
1/3 cup heavy cream
1 package pasta of your choice
grated Parmesan cheese

Cook your desired amount of pasta according to package directions.

Heat the sausages over medium heat until cooked through. Remove from heat.

In the same pan, cook the mushrooms on low heat for approximately 5 minutes. Add the garlic and cook for an additional 2 - 3 minutes. Add the tomato sauce, basil, and oregano. Heat this through, for about 3 - 5 minutes. Add the sausage and continue to cook for another 10 - 15 minutes, until sausages are hot. Stir in the cream.

Serve the sausages and sauce over pasta. Sprinkle with grated parmesan cheese. Attempt to not lick your plate clean!

*I believe I read somewhere that mushrooms should not be washed, but should be wiped off with a paper towel instead. I've been doing this, and it seems to be working!