Tuesday, December 21, 2010

Cupcakes from the Family Baker

Our first guest blogger! My sister is sharing one of her vegan cupcake recipes. My NON-VEGAN sister. And my NON-VEGAN self loves them! Seriously, don't back away just because of the lack of butter and eggs. These cupcakes are amazingly moist and have all the flavor, if not more, than regular cupcakes. Yes, this is coming from me! Thanks, Emily, for writing this post!


A few Valentine's Days ago, my lovely friend Kara and I decided to get each other the same cookbook that we both wanted, and that was probably the best Valentine's Day ever! I love baking vegan cupcakes. For some reason, I find them lighter, fluffier, moister, and delicious-er than cupcakes made with dairy products. Plus, they are really easy to make, and you've probably got most of the ingredients already! So next time you want to impress a vegan or want to make a lactose-intolerant person fall in love with you, this is a great place to start!

Two tips for vegan baking. The biggest problem with vegan baked goods is that they very easily become too dense. Here are two ways to avoid this problem:
  1. Sift, sift, sift!! I know it's kind of annoying. But you won't regret sifting your dry ingredients, because it helps in this second piece of advice.
  2. Whatever you do, DO NOT overstir! When you stir too much, all the air leaves your batter, and you get dense and chewy cupcakes. Only stir until just mixed - and by sifting, you avoid being left with large lumps of flour.

Don't let the vegan label frighten you. You don't even have to tell anyone that they don't have dairy or eggs - you'd never know if you didn't make them yourself!

Red Velvet (Vegan) Cupcakes
(from Vegan Cupcakes Take Over the World)

Line 12 muffin tins with cupcake liners. Preheat oven to 350.

1 cup soy milk
1 teaspoon apple cider vinegar

Whisk together in a bowl or large measuring cup and set aside for a few minutes to curdle.


1 1/4 cups all-purpose flour
1 cup granulated sugar
2 tablespoons cocoa powder
1/2 teaspoon baking powder
1/2 teaspoon baking soda
1/2 teaspoon salt

Sift together into a large bowl and mix.

1/3 cup canola oil
2 tablespoons red food coloring
2 1/2 teaspoons vanilla extract
1/2 teaspoon almond extract

Add oil, food coloring, and vanilla & almond extracts to curdled soy milk. Whisk well to combine. Gently fold wet ingredients into dry, mixing until large lumps disappear.

Fill cupcake liners about 2/3 full - these cupcakes will rise fairly high. Place in hot oven and bake 18-20 minutes until done, but do not overbake. Let cool for a few minutes and transfer to a cooling rack to cool completely.


Vegan Buttercream Frosting

Vegan frosting tends to be a little finicky. My best advice is to make sure all ingredients are at room temperature before making the frosting. Set them out when you bring the cupcakes out of the oven, and the temperature should be good by the time the cupcakes are cool enough to frost.

1/4 cup shortening
1/4 cup vegan margarine (like Earth Balance)
1 3/4 cup powdered sugar
3/4 teaspoon vanilla extract
1/8 cup soy milk or creamer

Beat together shortening and margarine until well combined and fluffy. Add sugar and beat about 3 more minutes. Add vanilla and soy milk, beat for another 5-7 minutes until fluffy.

Once cupcakes are completely cool, top with buttercream frosting.

You won't miss the eggs and butter one bit!

Sunday, December 19, 2010

A New Favorite?

I have grown up eating the same chili my whole life. I remember when my mom taught me to cook it. She and my sister have even converted it to a veggie version. It is hearty and warming. Large chunks of meat, beans, and a delicious tomato sauce build this chili. However (and yes, there had to be a however), I decided to try a new chili for dinner.


Cincinnati-style chili is something I have heard about before. Or seen. All I knew about it before was that it was made with much finer pieces of meat. Also, it is often served over spaghetti and garnished with cheese, onions, and beans. Then came the day I saw a recipe for it. Oh, the spices! It sounded delicious, and I had to try it.

I will say that this in no way will replace my original chili recipe. It's something different, and it is fabulous. But I don't always want different. So the next time I make chili I'm sure I will go back to the original and I will be blogging that. This new chili was probably not hub's favorite. I absolutely loved it: the flavors were phenomenal. I truly believe that everyone should try this. It will be worth it, even if it doesn't replace your standby chili recpie!


Also easily converted to veggie, this would be great with a TVP substitute. I realize that typically this style of chili is made with very small pieces of meat. I've read that the best way to achieve this is by cooking the raw meat in a pot of the liquid and whisking as it cooks. That totally skeeved me out, so I didn't do it that way. I think TVP would probably result in a more accurate consistency.

Cincinnati-style Chili
from Cooks Illustrated by way of Joelen's Culinary Adventures

1 lb. ground beef
3 cloves of garlic
2 tbsp. chili powder
1/4 tsp. cayenne pepper
2 tsp. dried oregano
2 tsp. unsweeted chocolate (shaved or minced)
1/2 tsp. ground allspice
1/2 tsp. ground cloves
1/2 tsp. ground cinnamon
1/2 tsp. ground black pepper
kosher salt, to taste
2 c. tomato sauce
2 c. chicken broth
1 c. water
2 tbsp. apple cider vinegar
2 tbsp. brown sugar

spaghetti, cooked per package directions
1 can of kidney beans, drained, rinsed, and warmed
1 onion, chopped
grated cheese (I used cheddar)


In a large dutch over or other pot, brown the ground beef over low heat, using a masher to break the meat up into small pieces. When the meat is nearly browned, add the garlic, chili powder, cayenne pepper, oregano, chocolate, allspice, cloves, cinnamon, black pepper, and salt. Heat for approximately 1 minutes. Add the tomato sauce, chicken broth, water, vinegar, and sugar. Bring to a boil. Reduce the heat to medium low and simmer for at least one a half hours.

Before serving cook the spaghetti. Serve the chili over the spaghetti and garnish with chopped onions, grated cheese, and warmed beans. Revel in the smell and taste of those amazing spices. I hope you love it as much as I did!

Wednesday, December 15, 2010

A New Classic

I finally ventured to try something many people would consider a classic comfort dish. Boy, am I sorry I waited so long! Let's see... green pepper, ground turkey, cheese, and tomato sauce. That is certainly a list of ingredients that is right up my alley. These stuffed peppers were delicious and very well-cooked. I've seen stuffed peppers on the list of various menus before, but was always hesitant to order because I was concerned that the peppers would be mushy. I am always, always a crunchy vegetable girl!


I added a little mexican flavor in these, which I think went over well. I could also up the cheese content, but since I'm slightly cheese-obsessed that's not so abnormal. It's possible that I made these slightly too spicy, but for some reason I've been on a huge spice kick. I've lowered the amount of cayenne pepper in the recipe below to account for this.

I would very much recommend making a veggie version of these as well. Using "crumbles" or TVP, I think, would also make a delicious meal. The original recipe called for four peppers, but I made this for two instead. We did end up with some extra filling, but one peppers plus the extra filling was perfect for hubs, while one pepper was plenty for me. Don't wait as long as I did to make this!


Stuffed Bell Peppers
adapted from Food by way of Joelen's Culinary Adventures

2 large green bell peppers
1/2 c. rice, cooked according to directions on packaging
1 tbsp. olive oil
1 medium onion, chopped
1/2 lb. ground turkey
2 cloves of garlic, minced
1 can diced tomatoes
1 c. + 2 handfuls of shredded cheese (I used colby jack)
2 tsp. chili powder
1/4 - 1/2 tsp. cayenne pepper (to taste)
kosher salt (to taste)


Preheat the oven to 350 degrees.

Cut the top with the stem off of the peppers and remove the seeds and innards. Bring water to boil in a large pot. Add a pinch of salt and the bell peppers. Cook until the peppers are just beginning to soften, about 3 - 4 minutes. Use a slotted spoon to remove the peppers from the water. Run cool water over the peppers to blanche and stop the cooking process. Drain on a plate with a paper towel. You may need to turn the peppers upside down to remove excess water from the inside. Place the peppers cut side up in a baking dish. I used a bread pan and this held them perfectly.

Heat the oil in a skillet over medium heat. Add the onion and cook until softened. Next add the garlic and cook for another 1 - 2 minutes. Add the ground turkey and break up while browning the meat. Once the meat is browned remove from heat. Add in the chili powder and cayenne pepper, along with a little more kosher salt to taste. Add the rice, tomatoes, and 1 cup of cheese. Mix to combine well.

Fill the peppers with the meat mixture. Top with another handful of cheese. Bake until the cheese is melted and bubbly and the filling is heated through, about 15 minutes.

Eat however you can figure it out! It will be delicious no matter what!

Sunday, December 12, 2010

Welcome to Our Kitchen

I'd like to welcome you to a special addition of At Home with the Raceys:

Conversation before dinner:

Hubs: What's for dinner tonight?
Me: I don't want to tell you.
Hubs: Why not? It's a simple question.
Me: You'll think it sounds weird and you won't want it.
Hubs: Tell me.
Me: Ok, Shakshuka.
Hubs: Why can't I just get a good ol' American meal in here once in a while?!
end scene

enter stage left, 30 minutes later
Hubs: Babe, this is great! I'm really amazed!

Allie: 1 Hubs: 0


Victory! Seriously though, I barely get credit for this one. This dinner was so easy, and delicious, and even nutritious! Yay for making a homerun super easy. The spicy tomato sauce is fantastic in this dish. The eggs add a really delicious rich quality to the sauce, although they are by no means overwhelming. The original recipe calls for feta, but I am SO not a fan, so I subbed in goat cheese. The slightly salty aspect of the goat cheese was perfect. Scooped up with some pita bread, this was a perfect weeknight meal.

This is apparently an Israeli side dish. I believe I've seen it similarly in other places. I could go into it more, but I will let the original poster do that. I heart Smitten Kitchen for posting fabulous recipes.


Shakshuka
barely adapted from Smitten Kitchen

1/4 c. olive oil
3(ish) jalapenos or other hot peppers (stemmed, seeded, and finely chopped)
1 small, yellow onion, chopped
3 cloves of garlic, chopped
1 tsp. ground cumin
1 tbsp. paprika
1 28-oz. can of whole, peeled tomatoes (undrained)
salt, to taste
4 eggs (or more, if you like, there is plenty of sauce)
1/3 c. crumbled goat cheese or feta
1 tbsp. chopped parsley
warm pitas


Heat the oil in a large skillet over medium heat. Add the chopped onion and peppers and cook until softened, about five minutes. Add the garlic, cumin, and paprika and cook for an additional two minutes. Dump the tomatoes in a bowl with their juice. Get in there with your hands and crush them (trust me, this was the best part). Add the tomatoes and their liquid to the pot, along with about 1/4 c. water. Add salt, to taste. Cook the sauce until slightly thickened and reduced (yeah, I'm still bad at this).

Crack the eggs on top of the liquid. Cover with the lid and cook until the yolks are just barely set, about 4 - 5 minutes. When this is complete, use a spoon to cover the eggs with sauce, without breaking the yolks. Add in the cheese and parsley. Serve with pitas: completely necessary for scooping up all that saucy goodness!

Make sure your husband appreciates your creativity.

Monday, December 6, 2010

The First of Many Cauliflowers

I am a late cauliflower bloomer. Hmm, does that make sense? Anyway, my mom was never a cauliflower fan. She really didn't enjoy the way that caulflower was most often prepared. Over time we have introduced her to a cauliflower recipe or two that she really loves. This one is definitely not it, and I wouldn't even suggest it. I will be posting some of my other favorite recipes soon, but I just happened to make this one, so it comes first. It is not my first favorite.
I don't mean that it isn't good. It's actually really delicious. But it's a simple combination of flavors: cauliflower, cheese, and nutmeg. It's a perfect simple side dish for some dressed-up protein. In this case, we ate this with chicken marsala. Simple and delicious... works for me!

The original recipe calls for boiling the cauliflower in stock. I have done this and steamed it instead. Both were great, and there honestly wasn't much difference. Believe it or not, I'm actually horrible at reducing liquids, so I sort of like steaming the cauliflower better. I will post it that way here, but follow the original link if you'd rather boil it in stock.
Smashed Cauliflower
adapted from Rachel Ray via Food Network

1 head of cauliflower, cut into florets
2 tbsp. butter, cut into cubes
1 - 1 1/4 c. shredded white cheddar cheese
1/4 c. parmesan
1/4 - 1/2 c. milk
ground black pepper (or peppercorn medley) & salt
1/2 tsp. nutmeg

Steam the cauliflower until soft, about 10 minutes, depending on the size of your florets. When soft, transfer to a medium-size pot over medium-low heat. Add in the butter, cheese, and milk. You want enough liquid to create a cheesy sauce for the cauliflower, but not so much that it will be too soupy to eat. Using a masher, break up the cauliflower until it is the consistency of a chunky puree (what?). The cheese should melt. Add in the salt, pepper, and nutmeg, to taste. If the sauce is too thin, turn the heat up slightly and cook until thickened, stirring regularly.

If you are a cheese fan, you will be a fan of this!

Saturday, December 4, 2010

Comfort Fish?

The hubs and I really love fish. Like eat it at least twice a week in the summer, especially on the grill love it. It's not necessarily something I crave a lot of in the winter. I mean, when all I want is a nice, hot bowl of soup or some carb-heavy comfort food, fish is not the go-to dish (har har). However, I believe this could be the exception. Baked in the oven with potatoes, tomatoes, and jalapenos, this is everything I want a winter-fish dish to be: warm, hearty, and comforting.
This is an incredibly simple weeknight meal. It is one of those very special meals that tastes like you spent more hours on it than you actually did. The saucy tomatoes were probably actually my favorite part of this meal, although I generall don't like tomatoes. If you're of the veggie sort, this could probably be made well with some beans or other form of protein as well. Trust me, no matter what, you don't want to miss out!

Jalapeno Baked Fish with Roasted Tomatoes and Potatoes
from The Way the Cookie Crumbles

1 lb. (about 4) red-skinned or Yukon Gold potatoes
1 tbsp. olive oil
1 tsp. salt
1 15-oz. can diced tomatoes
1 large garlic clove, peeled and coarsely chopped
1/3 c. cilantro, chopped and loosely packed
2 tbsp. pickled jalapenos
2 - 4 filets of fish (white, we used tilapia)

Preheat the oven to 400 degrees. Wash the potatoes and slice them about 1/4 inch thick. The thicker you slice them the longer it will take for them to cook. Drizzle on the olive oil and sprinkle them with salt. Toss to coat in a baking dish, 8 x 8 or slightly larger. Cover with plastic wrap with some small holes poked in it and microwave for about five minutes, or until the potatoes are tender.

In a food processor or blender, combine the tomatoes (with their juice), garlic, cilantro, and jalapenos. Process to a puree, leaving as much texture as you prefer. Lay the fish filets over the potatoes and cover with the tomato mixture. Bake the entire dish for approximately 15 - 20 minutes, until the fish is flaky.

Be sure to lick your plate clean at the end of the night.

P.S. I just realized my pictures here stink. I will post the one decent one and try to remember to update them next time we make this.

Monday, November 29, 2010

We Bought 10 Pounds of Sweet Potatoes

Well, that would be the joy of the farmer's market! We bought a basket full of sweet potatoes, about 10 pounds worth for $4. I mean, how could you not? Even though it means being extra-inventive with sweet potatoe dishes because how many times can a person really eat sweet potatoes with marshmallows on top?! Lucky for me, there are actually a lot of other ways to prepare sweet potatoes, and I have my sister to point me in the right direction!


These sweet potatoes were a perfect side dish. The flavor combination was phenomal - but then haven't we all determined that the sweet and salty combo is number one? The added rosemary and maple syrup also created a delicious pairing that has been seen before in our favorite marinade. Basically, I suggest that you make this. It will go well with anything. Or nothing, if you prefer to just eat a bunch of potatoes for dinner, which I highly enjoy. Trust me, you won't regret it!

By the by, does anyone know what the difference between yams and sweet potatoes really is?


Maple and Rosemary Sweet Potatoes
inspired by my rockin' sister

3 - 4 sweet potatoes, cut into bite-size pieces
1/4 c. olive oil
3 tbsp. maple syrup
1 - 2 tbsp. rosemary, chopped
salt & pepper, to taste

Preheat the oven to 350 degrees. Peel and chop the sweet potatoes. Place them in a bowl with the olive oil and maple syrup, making sure you have enough liquid to coat the potatoes well. Toss them with your hands (slimy, yes, but fun!). Add in the rosemary, salt, and pepper and continue to toss until well-coated. Place in a single layer on a baking sheet. Bake for 30 - 40 minutes, until the potatoes are slightly browned and soft when poked with a fork.

Eat every last one. Seriously. Do it.

Saturday, November 6, 2010

It finally feels like November

I may have already said this, but I love soup in the winter. I love the way that the ingredients meld together and particularly how it seems to get better after a day in the refrigerator. The best thing about this soup is how smooth and creamy it is without actually using any cream! It is delicious and has already been made multiple times in this household.


I was a little concerned about the pancetta at first. It just sounds weird to know that you're basically going to blend meat. It really adds a great flavor to the soup though, and wasn't weird at all. I think this soup would be great as a vegetarian version, but you might want to up the salt content to make up for the lack of pancetta.

The only other change I would suggest considering is to leave some of the beans whole. Last time hubs made this request and it turned out great. We left one of the three cans of beans out until after the soup was blended and then added those beans and heated them up. It added just a little more texture to the soup if that's your sorta thing.

White Bean Soup
adapted from Williams-Sonoma by way of The Lushers

1/4 lb. of pancetta (calls for 1/2 c. but I order 1/4 lb. from the deli and use it all)
1/2 yellow onion, chopped
1 carrot, chopped
2 celery stalks, chopped
4 cloves of garlic, minced
3 15-oz. cans cannellini beans
5 c. chicken or vegetable broth
3/4 tsp. fresh thyme
1/2 c. parmesan cheese
salt & pepper

In a large, heavy-bottomed pan, fry the pancetta, with a little olive oil if necessary. Cook for about five minutes and then add the onion, carrot, celery, and garlic. Cook until softened, about 10 minutes. Next, add the beans*, broth and thyme. Bring to a boil and then reduce the heat to low. Simmer for approximately 15 minutes.
(and I just realized we used red onion... eh... whatever!)

Remove from the heat and puree with an immerion blender until smooth. You can also use a regular blender or food processor, but the immersion blender basically rocks. Stir in the cheese and season with salt and pepper. You can also reserve the cheese and sprinkle it on the soup at the table. I actually prefer this method because I think it reheats a little better.

Slurp and enjoy! And don't forget that it will likely be even better tomorrow!

*Don't forget you can also reserve one can of beans until after you puree the soup.

Tuesday, October 26, 2010

Hockey Tailgating

Here in Carolina we do something special. We tailgate during hockey games. Walking through the parking lots at the RBC Center you will find people hanging out, grilling, and having some beverages. As long as the weather will tolerate us, anyway! Since we don't have a small, portable grill, we enjoy some barbecue before our games.

We first made this recipe during a crock-pot feast after beer fest. It was really easy to make and super delicious as well. We ate this on small slider size rolls with some coleslaw and it was enjoyed by all. The recipe calls it South Carolina Pulled Pork, but the only SC barbecue I've had was mustard-base, and this is cooked in vinegar, which is generally what we have in this area of NC. So I have consequently renamed the recipe. No big deal, right?!

Sorry for the poor quality pictures, I will attempt to replace them next time we make this!


North Carolina Pulled Pork (Crock-Pot Style)
adapted from

3 lbs. pork shoulder
1 tbsp. onion powder
2 tbsp. paprika
4 tbsp. brown sugar
2 tsp. chili powder
1/2 tsp. ground allspice
1/2 tsp. ground black pepper
2 tbsp. vegetable oil
3/4 c. apple cider vinegar

Mix the onion powder, paprika, 1 tbsp. brown sugar, chili powder, allspice, and black pepper. Remove one tbsp. of the spice mixture. Rub the remainder of the mixture evenly all over the pork. Wrap the pork in plastic wrap and let stand at least one hour or refrigerate overnight.

Heat the oil in a large skillet and brown all sides of the pork. Transfer the pork to a slow-cooker. Add the vinegar, reserved spice mixture, and the remaining 3 tbsp. of brown sugar to the slow-cooker. Cover the cooker and cook for 6 to 10 hours, until the pork is fork tender.

Remove the pork and shred with two forks. Add some tabasco sauce to the cooker liquid, if desired. Return the pork to the cooker and toss to coat with the liquid. Serve immediately on rolls with some coleslaw, if that's how you like your barbecue sandwiches! Trust me, you will enjoy!


Thursday, October 21, 2010

A Good Staple


So a few months ago I set out to make an apple crisp. I googled recipes and searched blogs. I just wanted something basic, with ingredients I already had on hand. I even asked my sister, you know, the baker in the family. She is the self-professed Queen of Crisps, and since she never brags, if she says that it must be true. I found many variations with interesting add-ins and odd fruits and flavors. I just couldn't find a simple apple crisp recipe.
I know it sounds silly. Lots of online sources and my sister tried to explain to me how to make the topping. A little flour, a little melted butter, and some brown sugar. Somehow I came out with a version of a pie crust. Or maybe it was cobbler? I don't honestly have any idea what it was, but it was most certainly not a crust. This story really just goes to prove that it's not in my head that I MUST have a recipe to follow, at least the first time.

So while many of you probably know how to make an apple crisp, I am posting this for those of you like me that truly need a recipe, even for something seemingly as simple as crisp topping. And this one was certainly delicious. As evidenced by the bowl licked clean by the hubby and his brother. Thanks Betty Crocker!


Apple Crisp
from Betty Crocker

1/2 c. all-purpose flour
1/2 c. oats
3/4 c. brown sugar
3/4 tsp. cinnamon
3/4 tsp. nutmeg
1/3 c. margarine or butter (melted)

apples (about 5 medium)

Preheat oven to 375 degrees. Arrange the apples in a baking dish, about 8 x 8. Combine all dry ingredients in a medium bowl. Add the melted butter and stir until crumbs form. Spread evenly over the apples. Bake for 30 minutes or until topping is golden brown and crispy. Serve with ice cream or homemade whipped cream.

Hmm, typing this now, I feel kind of dumb. Oh well, variations could include:
-adding nuts to the topping
-adding some lemon juice to brighten up the apples
-adding a cinnamon/sugar mixture to the apples themselves

Enjoy, no matter how you make your crisp!

Tuesday, October 19, 2010

Canadian Thanksgiving

Yes, please! (One of) the awesome things about having Canadian friends is getting to celebrate an early Thanksgiving! Thanksgiving food is so delicious, and a lot of it only gets eaten once a year. I mean, what's up with that? Turkey, potatoes, stuffing, veggies, and pie... I understand saving up the quantity, but there's no reason not to eat some of these at other times.


Anyway, we were fortunate enough to be invited to celebrate Thanksgiving on October 11 (well, technically it was October 10) with some great friends. They pulled out all the stops and had a great spread. Most everyone contributed something. I decided to bring a little of the South to the feast.

Last year during Thanksgiving I made Sweet Potato Casserole Candied Yams Who the Heck Knows Anyway?! for the hubs and his family. I honestly had no idea what I was doing, but they raved over it and I'm pretty sure someone even said it was the best they'd ever had. I think the trick was using fresh sweet potatoes instead of canned yams. Anyway, I offered it up again this year and have to say I was even more pleased. Last year I tried them and thought it was iffy. This year the potatoes (from a local farm) were amazing and full of flavor and the slightly toasted marshmallows on top added a great crunch.

I'm quite sure these will be making an appearance at American Thanksgiving too!


Allison's Southern Sweet Potatoes (there, I renamed it)

can feed up to 15 people if served as a side

5 lbs. of sweet potatoes (the fresher - and more local - the better!)
2 - 4 tbsp. butter
1/2 c. brown sugar
2 c. small marshmallows

Preheat the oven to 350 degrees.

Boil the sweet potatoes with the skins still on them. Enjoy the amazing, sweet smells that fill the kitchen. When the potatoes are tender (when poked with a fork), remove them from the water. Cut them in the half (or in quarters) and slide the skin off. Cut the remaining chunks into bite size pieces.

Place one half of the potatoes in a shallow rectangular baking dish (I used 9 x 13). Top with 1 - 2 tbsp. of butter (cut into small cubes) and up to 1/4 c. of the brown sugar. Layer the remaining potatoes on top. Cover these with the remaining small cubes of butter and the remaining brown sugar. Evenly place the marshmallows on top of this layer.

Bake for 25 - 30 minutes, until the marshmallows are slightly toasted and you can see the melted sugar and butter boiling in the bottom of the dish (if you can't see this, it's ok).

Seriously, try this! Even if you're not sure if you like sweet potatoes... a lot of people felt the same and still enjoyed this (or at least lied to me)!

Wednesday, October 13, 2010

Perfect Fall Cookies

Well, things have been busy around here! Luckily they have been busy with lots of things I have to share with you! This past weekend has included a beer fest, a meal o' crock pots, and Canadian Thanksgiving. So there is much to come! First, however, I'm going to bring you an excellent fall cookie recipe.

Of course, I'm always wishing my sister was around to do the baking for me, but since that's not the case I had to step it up. I saw the recipe for this on Brown Eyed Baker and knew that I would love the pumpkin cookie and hubby would love the cream cheese icing. Anyone who knows him and me knows that we make an excellent couple because I eat the cake and he eats the icing we're always looking out for each other. Anyway, I saw these and wanted to make them for him. I saw the perfect opportunity when the pops and the bro-in-law came to visit this weekend.

This recipe is phenomenal. The cookies are soft and moist and the icing is delicious. My only comment is that the icing was just slightly grainy from the powdered sugar. It tasted great as is, and you couldn't tell when it was sandwiched in between two cookies (who do you think was eating the icing alone?) but I might cut down the sugar by 1/4 cup next time.

I halved this recipe, but sort of regret it and wish I had made the whole thing. This is the original recipe.

Pumpkin Whoopie Pies with Maple Cream Cheese Frosting
not really adapted from Brown Eyed Baker

for the whoopie pies:
3 c. all-purpose flour
2 tbsp. cinnamon
1 tsp. baking powder
1 tsp. baking soda
1 tsp. salt
1 tsp. ground ginger
1/2 tsp. ground nutmeg
1 c. sugar
1 c. dark or light brown sugar
1 c. canola or vegetable oil
3 c. canned pumpkin puree
2 eggs
1 tsp. vanilla extract

for the filling:
3 c. powdered sugar
8 ounces cream cheese (room temperature)
1/2 c. butter (room temperature)
3 tbsp. maple syrup
1 tsp. vanilla extract

Preheat the oven to 350 degrees. Line baking sheets with parchment paper, or just use non-stick. Whisk the sugar and brown sugar and the oil together. Add the canned pumpkin and whisk together. Lastly, add the vanilla and eggs together and continue to whisk until well-combined.

Add the flour, baking powder, baking soda, salt, cinnamon, nutmeg, and ginger. Whisk the dry ingredients into the wet ingredients until the flour is combined. Use a large spoon to drop rounded spoonfuls onto the cookie sheet, about 1 inch apart. Bake for 10 to 12 minutes or until tops are just beginning to crack. Let the cookies cool completely.

To make the filling beat the butter on medium with an electric mixer until it is smooth. Add in the cream cheese and continue to beat until smooth once more. Add the powdered sugar, about 1/3 - 1/2 cup at a time and beat until smooth. Add in the vanilla extract and maple syrup and beat until combined.

Assemble the cookies by spreading (or piping) the filling onto half the cookies. Top them with the other half. If you're my husband, spread some more icing on top of the sandwich. Otherwise enjoy as is!

Sunday, October 3, 2010

Mom's Muffins

Wow. So... sorry for the disappearance. I had such great intentions. The whole month of September got away! There was actually a week in there where the most I cooked was making a grilled cheese sandwich. But there was some good kitchen time in there as well. I do have a bit of a backlog of recipes that I want to share, and am also really looking forward to the soups and comfort foods that come with fall cooking. I promise to make October awesome and share a lot of great stuff in the coming weeks!


For now, here is a recipe for another one of our family favorites. Mom has an amazing muffin recipe. Until now, my sister and I have joked that we could never imagine making these on our own because it's always what Mom makes when we go home. That was until I woke up this morning craving muffins, and Mom wasn't here! I had to take matters into my own hands and whip some up.

These are super easy, and you probably have all the necessary ingredients in your pantry already. They're really simple, but the finishing step of cinnamon and sugar on top of melted butter totally makes them amazing. They will probably take about 30 minutes from start to finish, so even waking up hungry doesn't have to stop you from making them!

Mom's Muffins


1 egg
3/4 c. milk
1/2 c. vegetable oil
2 c. all-purpose flour
1/3 c. sugar
3 tsp. baking powder
1 tsp. salt
1/3 c. butter
1/3 c. sugar
2 tsp. cinnamon

Preheat oven to 400 degrees.

Beat the egg. Add in the milk and vegetable oil. Beat all in the dry ingredients until the flour is moistened but the batter is still lumpy. Either grease a muffin pan or use cupcake liners. Pour the batter into the muffin cups so they are about 3/4 of the way full.


Bake for 20 minutes, or until golden brown. Immediately remove from the pan. Melt the butter. Mix the cinnamon and 1/3 c. sugar together. Roll the muffins in the melted butter and then in the cinnamon sugar mixture. Eat and don't forget to lick the paper clean!

Tuesday, September 7, 2010

A Most Dee-lish Pizza

One of my favorite pizzas in the whole wide world comes from Brixx restaurant. They make their pizza with a very thin, crispy crust. They have a ton of different topping combinations, and I'm sure they're all fantastic. My favorite option is the roasted chicken. Fresh mozzarella cheese topped with thinly sliced tomatoes, roasted chicken, and oregano. I could eat it all day long. And I usually eat a 10" pizza by myself. Oops!

This pizza was the inspiration for dinner last night. Using this pizza crust, the hubs and I topped it with everything Brixx uses. The pizza crust fit with it perfectly. We grilled the chicken instead of roasting it. The chicken was juicy and flavorful. The tomatoes and mozzarella, of course, are a perfect combination. However, I think my favorite part of this pizza is the oregano. It gets dried slightly from the heat of the oven and tastes just amazing. I recommend loading it up!

Grilled Chicken Pizza
adapted from Brixx Restaurant
pizza crust (fresh, frozen, store-bought, or homemade)
mozzarella cheese
two tomatoes, thinly sliced
4 sprigs fresh oregano
chicken
1/4 c. olive oil
2 tsp. italian seasoning (dried)
salt & pepper

The chicken can be prepared however you like it. This is how we prepared ours. Season the chicken with salt and pepper. Preheat the grill on medium. Cook the chicken for about 5 or 6 minutes. Mix about 1/4 c. olive oil with 2 tsp. italian seasoning. Brush the chicken generously with the olive oil mixture. Finish cooking the chicken through completely. Remove from the grill and cut into bite-size pieces. Brush with olive oil again.

Top the pizza crust with the mozzarella. Place the tomatoes on top. Scatter the oregano around the pizza. Lastly, top with the bite-size chicken and season with salt and pepper. Bake according to the directions for the pizza crust. In our case it was 15 minutes at 425 degrees.

Trust me, you will not regret making this!

Wednesday, August 25, 2010

A Southern Staple

The hubs and I are trying not to be out of control with our eating. Thus, we have decided to try to keep dessert down to once a week, specifically on Sundays. That's not to say that we won't eat something that's put in front of us, but we're trying to be good a majority of the time. Hubs had a special request this weekend, and since I love him so much of course I acquiesced. I grew up with a mostly neutral to Northern family, while the hubs grew up decidedly Southern. I don't believe that I've ever had banana pudding before, but that is what we decided to make this past weekend.

We were feeling pretty lazy on Sunday, so we opted not to make our own pudding. You certainly could, and I'm sure it would be delicious. However, we enjoyed this dessert with instant box pudding as well. So no pressure, let this be something you can relax and enjoy on a Sunday evening with family and friends. I know we did!


Southern Banana Pudding

3 bananas (sliced)
Nilla wafers
1 box vanilla pudding
1 box banana pudding
2 c. whipped cream
4 tbsp. sugar

Mix the pudding according to package directions. You can do both in the same bowl, as we chose to do.

Make the whipped cream. Combine cream and sugar and whip until stiff peaks form. Set aside.

In a 2 qt. dish, put a layer of pudding. Follow that by a layer of bananas and a layer of Nilla wafers. Repeat this process until you have used all of the pudding. We got about three layers. Top this with whipped cream and add a few Nilla wafers in as a garnish.

Dig in and enjoy!

Monday, August 16, 2010

My Favorite Summer Soup

I know soup in the summer time seems a little strange. Except when you really think about it, we spend most of our time in the nice, cool air conditioning (if you are lucky enough to have it!) anyway. AC is actually the perfect weather for soup! Still, I don't think I could handle anything too heavy. Even my beloved potato and leek soup is a bit much for the most doggiest days of summer. Minestrone is my go-to.

I'm not sure what actually makes minestrone minestrone. Most of the time I know it's supposed to be made with beans, more specifically garbanzo beans. I don't really like garbanzo beans, so I left them out. I could use white beans as a substitute, but I really like the soup the way it is, so I haven't been bothered to make any changes. The veggies are delicious in this, and I think the beef flavor is fantastic. Be sure to load it up with some parmesan on top, it definitely helps the flavor!


Minestrone
adapted from some old cookbook of my mom's!
1 lb. lean ground beef
1 large onion, chopped
1 c. celery, chopped
2 carrots, chopped
8 c. beef broth (can use bouillion or Better than Bouillion)
1/2 tsp. dry basil (I have used 1 tbsp. fresh)
1/2 tsp. dry oregano (I have used 1 tbsp. fresh)
3 ounces pasta of your choice
1 package frozed, chopped spinach (thawed)
1/2 c. grated parmesan
In a large, 6-quart pan, brown the meat. Don't drain it once it has finished. Add the onion, celery, and carrots and cook until softened, about 10 minutes. Add the beef broth, basil, and oregano. Bring this to a boil, then reduce the heat, and cover. Simmer for approximately 45 minutes. Add the pasta and spinach and increase the heat slightly to about medium-high. Cook the pasta according to package directions until al dente. Add 2 tbsp. of parmesan and stir. Season to taste with salt and pepper.
Sprinkle the rest of the parmesan over soup in bowls. This should make about 6 to 8 servings. Slurp it up!

Thursday, August 12, 2010

My Favorite Summertime Dessert... Maybe?


I think strawberry shortcake is my favorite summer dessert. Or maybe it's blueberry pie. Or any pie, for that matter. But seriously, I think it's strawberry shortcake. What is it about fruit and pastry that is so delicious?! Add a little whipped cream or a little vanilla ice cream, and you've got perfection, in my humble opinion. As a matter of fact, I think I'm going to find another excuse to make this today.


Every part of this is easy and delicious, even on it's own. Although you might garner some stares by eating an entire bowl of sugar berries by themselves. I won't say the thought didn't cross my mind. Originally I wasn't planning on making whipped cream, but I forgot to buy any at the store. I'm SO glad I did, because it was easy and way worth it to just whip (!) some up. Actually, I keep asking hubs if we can make more whipped cream to put on just about everything. He keeps saying no.

Strawberry Shortcake
slightly adapted from Betty Crocker

Berries:
1 qt. strawberries
1 c. sugar

Mix the berries and the sugar in a bowl and refrigerate for at least an hour.

Shortcake:
1/3 c. shortening
2 c. all-purpose flour
2 tbsp. sugar
3 tsp. baking powder
1 tsp. salt
3/4 c. milk
Preheat oven to 450 degrees. Cut the shortening into the flour, 2 tbsp. sugar, baking powder, and salt using your hands, a pastry cutter (my preferred method), two knives, or a mixer until you get fine crumbs. Stir in the milk slowly until the dough just comes together. Smooth the doung into a ball on a lightly floured surface and knead 20 - 25 times. Roll it out to 3/4 to 1-inch thickness. Cut with a floured 3-inch cutter. Place an inch apart on an ungreased baking sheet and bake for 10 to 12 minutes.
Whipped Cream:
1/2 c. heavy cream
1 tbsp. sugar

Using an electric mixture, whip the cream and the sugar until stiff peaks form. Don't overhwip!
Spoon berries and whipped cream over the biscuits and savor for a perfect summer evening.

Dijon Pork Chops

Not a very creative title. After a long day of work, gym, and cooking I have to say the creative juices are just not flowing. So I will just let the title reflect the awesomeness of this easy and delicious meal. The hubby and I have been making this one for years. This was actually one of the first recipes we discovered and cooked together. It hasn't lost it's greatness over the years. We love this with simple sides, like potatoes or roasted veggies. It's easy on a weeknight and full of flavor. Enjoy!

Dijon Pork Chops
not really adapted from kraftfoods.com

4 pork chops, approximately 1/2 inch thick
4 tsp. dijon mustard*
1/2 c. Shake n' Bake pork seasoning coating mix

Preheat the oven to 375. Slather the chops with the mustard. We use quite a bit on this because we looove mustard, but do this to your taste. Cover the chops with the coating mix. Place on a foil-lined baking sheet and bake for about 30 minutes, or until cooked through.


Note: We have always used Shake n' Bake for this, but I'm sure any other coating mix, breadcrumbs, or whatever you like to coat meat would work just as well!

*We used horseradish mustard tonight for a change and it was equally as delicious!

Wednesday, August 11, 2010

Oops

I know it's been a while since I posted. Life has been in the way, I suppose. We've still been cooking and doing lots of fun things in the kitchen, I just haven't been as good about writing it up. Or taking pictures, in some instances. But I've been enjoying taking it easy and hanging out with the hubby every chance I get. Because that's still fun!

Next up I'm hoping to do some home improvement projects as well. Since we have a brand new house there's really nothing that needs to be done to "fix" it. However, in the words of the hubby, it's a bit bland. We're planning on doing some decorating and some fun little projects in the next couple weeks. If we do anything exciting in the kitchen, I will be sure to post it! Since it's semi-related, and hey, it's just fun!

For the time being, I'm squeaking by with a cheat of a post, but at least I got something up here! I will post something more significant soon, promise! I thought I'd do a little update to the fish with ginger-basil butter sauce post, since I've been doing a lot with it lately (and no pictures necessary!).

-This is a very flexible sauce. I've successfully substituted garlic for the ginger and rosemary and/or thyme for the basil. Next I think I'll try some sage.
-It's also very easy to half the recipe. That makes plenty for the two of us.
- Don't use any lemon juice, even if you don't get a lot of zest off the lemon. It makes the sauce kinda funny!

Feel free to comment if you do anything different to this sauce with success!

Saturday, July 31, 2010

Mom's Pizza

Another family staple 'round these parts is Mom's pizza. Every vacation from school or time when the family would gather at home we would request Mom's pizza. The crust is different (and way better!) than any delivery pizza. Plus, making pizza at home is fun! There's so much shredded cheese to eat. That's gotta be the best part!
Emily and I had our first attempt at Mom's pizza when she came down for a visit. Overall I would consider it a success. I definitely needed some extra instruction as far as rolling out the dough. But with some help and a little practice, I managed to roll out a lovely circle, all ready for topping!
Mom's Pizza

1 package (1/4 ounce) active dry yeast
1 c. warm water (use very warm tap water)
1 tbsp. sugar
3 c. flour
1/2 tsp. salt

In a large bowl, dissolve the yeast in the warm water, Add the sugar and leave it for 5 to 10 minutes. This will result in a little film or foam, like the picture below:


Add 1 cup of flour and beat well. Sift together the remaining 2 cups of flour and 1/2 tsp. of salt and add it to the bowl. Beat until smooth and if you find your dough too sticky, add some more flour. The dough should be fairly stuff by the time you're done. Turn the dough out onto a lightly floured surface and let it sit for 3 - 5 minutes. Knead the dough for 2 - 5 minutes.

Place the dough in a greased bowl and let it stand in a warm place, free from drafts until slightly risen, about 30 minutes. Divide the dough in half and knead each piece slightly. Wrap each piece loosely in plastic wrap. Be sure to wrap it loosely so the dough can continue to rise. Refrigerate until ready to use, at least 2 hours.

Preheat the oven to 425. Brush two pizza pans with oil. Roll out the dough to fit the pizza pan. Top your pizza with the sauce and toppings of your choice. Bake the pizza for about 15 minutes. It's probably best to bake one pizza at a time, or else the crust may not brown properly. Watch it to make sure it doesn't get overdone, you will be able to tell when it's ready. Let the pizza sit for 2 - 3 minutes before cutting into it.

Not so scary for pizza, huh?! Enjoy!

Wednesday, July 21, 2010

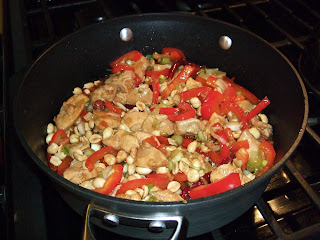
Kung Pao Chicken!

I really do love to cook. Even after a long day at work, coming home and making dinner doesn't seem like a chore. I mean, afterall, that was the whole point of this, right?! I had a lot of fun with this dish. I got really tired of my old go-to stir fry, so I decided I needed another way to cook meat and veggies and serve with rice. I LOVE Kung Pao chicken when I've ordered it in the past. Why not make my own? I had a blast hanging out in the kitchen messing with different ingredients (and enjoying a glass of white wine, I must say!) to get just the taste I was looking for.

I tweaked a couple different recipes and read up on Kung Pao Chicken so that I could really try to get the flavor right. It was definitely not standard stir-fry! I thought the flavor was great and the spice was just right. Definitely a little heat, but nothing bad at all. Don't be concerned at the number of ingredients. Many of them you probably have on hand, and the ones you don't I'm sure are worth the investment! They're not expensive and will likely last a long time.

There weren't many leftovers, but what we had the hubs has already done away with... I think that's the sign of a successful meal!

Kung Pao Chicken
adapted from Cooks Illustrated via The Way the Cookie Crumbles

3 cloves of garlic, finely chopped
1 tbsp. grated or minced ginger
5 - 6 scallions, white parts and light green parts chopped
2 large chicken breasts
1 red bell pepper, chopped
7 whole red chiles
1 tbsp. vegetable oil
1 tsp. sesame oil
1/2 - 1 cup roasted, unsalted peanuts

Marinade:*
1 tbsp. dry sherry
1 tbsp. soy sauce
1 tbsp. chicken broth

Sauce:**
1/2 cup chicken broth
3 tbsp. apple cider vinegar
2 tsp. sesame oil
1 tbsp. soy sauce
1 tbsp. + 1 tsp. hoisin sauce
1 1/2 tsp. cornstarch

Cut the chicken into bite size pieces. Mix the marinade ingredients in a small bowl. Toss in the chicken and marinade at least 10 minutes. While this is marinating is a good time to prepare the ginger, garlic, red pepper, and scallions.
Meanwhile, mix the sauce ingredients in a small bowl with a whisk and set aside.

Heat the vegetable oil and sesame oil in a wok or large frying pan. Add the chicken. Once the chicken is browned, add the chiles whole. I was somewhat careful not to break them apart once I added them to the pan so that the seeds wouldn't be released and make the dish super spicy. Not sure if this is legitimate, but it seemed to work. Add the garlic and ginger and cook for about 3 minutes. Add the red pepper and cook until slightly softened, about 5 minutes. Whisk the sauce again to recombine and add it to the pan; cook until slightly thickened. Last, add the green onions and peanuts and mix everything thoroughly.

Serve over rice. Trust me, it won't last long!

*This dish would be pretty easy to turn vegetarian. If I was going to do that I would use tofu because I think it would hold the marinade better than some other substitutes. Feel free to keep us posted if you try it one way or the other!

**The only thing I would change is to make more sauce next time. The dish was still tasty, but I tend to like things extra saucy. So I would up the broth to 3/4 cup and adjust other flavors accordingly.